Hail Damage Roof Repair: 7 Steps to Inspect & Repair a Roof
Posted 6.26.25 | 9 Minute Read
Hailstorms can strike without warning, leaving your roof vulnerable to damage that may not be immediately visible. Understanding how to properly inspect and repair hail damage is crucial for protecting your home and maintaining your roof’s integrity. This comprehensive guide will walk you through the essential steps for identifying hail damage, assessing the severity, and taking the right repair actions to restore your roof’s protection.
In this article, you’ll learn:
- How to safely inspect your roof for hail damage
- The step-by-step process for hail damage roof repair
- How to choose the right roofing contractor for repairs
💡 Understanding Hail Damage to Your Roof

Hail damage occurs when ice pellets strike your roof with enough force to compromise shingles, gutters, and other roofing materials. The severity depends on several factors, including hail size, wind speed, roof age, and the quality of your roofing materials. If you’re unsure what hail damage looks like, check out our detailed guide, What Does Hail Damage Look Like on a Roof? to compare real examples and signs you can look for after a storm.
Common Types of Hail Damage
Hail can cause various types of damage to your roof:
Granule Loss: Asphalt shingles lose their protective granules when struck by hail, exposing the underlying mat and reducing the roof’s ability to protect against UV rays and weather.
Cracked or Split Shingles: Larger hailstones can create visible cracks or splits in shingles, allowing water to penetrate the roof system.
Exposed Roof Deck: Severe hail damage can punch holes through shingles entirely, exposing the wooden deck beneath.
Dented Metal Components: Gutters, downspouts, flashing, and metal roofing materials often show obvious dents after hail storms.
Damaged Soft Metals: Roof vents, chimney caps, and other soft metal components are particularly vulnerable to hail damage.
✅ 7 Steps to Inspect and Repair Hail Damage

Inspecting and repairing hail damage promptly can prevent small issues from turning into costly repairs. It helps maintain the safety, value, and longevity of your property or vehicle.
1. Document the Storm and Initial Damage
Start by documenting all details about the storm, as this will serve as critical evidence for your insurance claim. Record the exact date and time of the storm, along with any notable weather conditions, such as high winds, heavy rain, hail, or lightning. Take plenty of photographs or videos showing the state of your property immediately after the storm. Focus on areas like your yard, vehicles, and any external structures, such as sheds or fences, that may have been impacted. Ensure you capture images of fallen tree branches, broken windows, and any visible damage to your house exterior.
Next, contact your insurance company right away to report potential damage and initiate a claim. Be aware that many insurance policies have strict deadlines for submitting claims after a storm, so it’s important not to delay this step. If possible, review your policy to understand your coverage and prepare to provide your insurer with as much evidence as possible.
2. Conduct a Ground-Level Inspection
Once the storm has passed, conduct a detailed inspection of your property at ground level to identify potential damage. Walk around the perimeter of your house and examine it thoroughly. Look for signs of damage to gutters and downspouts, such as dents, cracks, or areas where they have detached from the house. Pay special attention to siding, doors, and windows for any visible impacts, such as cracks, chips, or dents that may have occurred during the storm.
Additionally, inspect the ground around your property for debris that could indicate roof damage. Pieces of shingles, flashing, or granules commonly found in and around your gutters may point to roofing issues. If you notice these signs, it’s a good indicator that your roof needs closer inspection. Document these findings carefully for your insurance report. Homeowners in the Charlotte, NC area should be especially cautious during hail season, as frequent storms can intensify roof wear and tear.
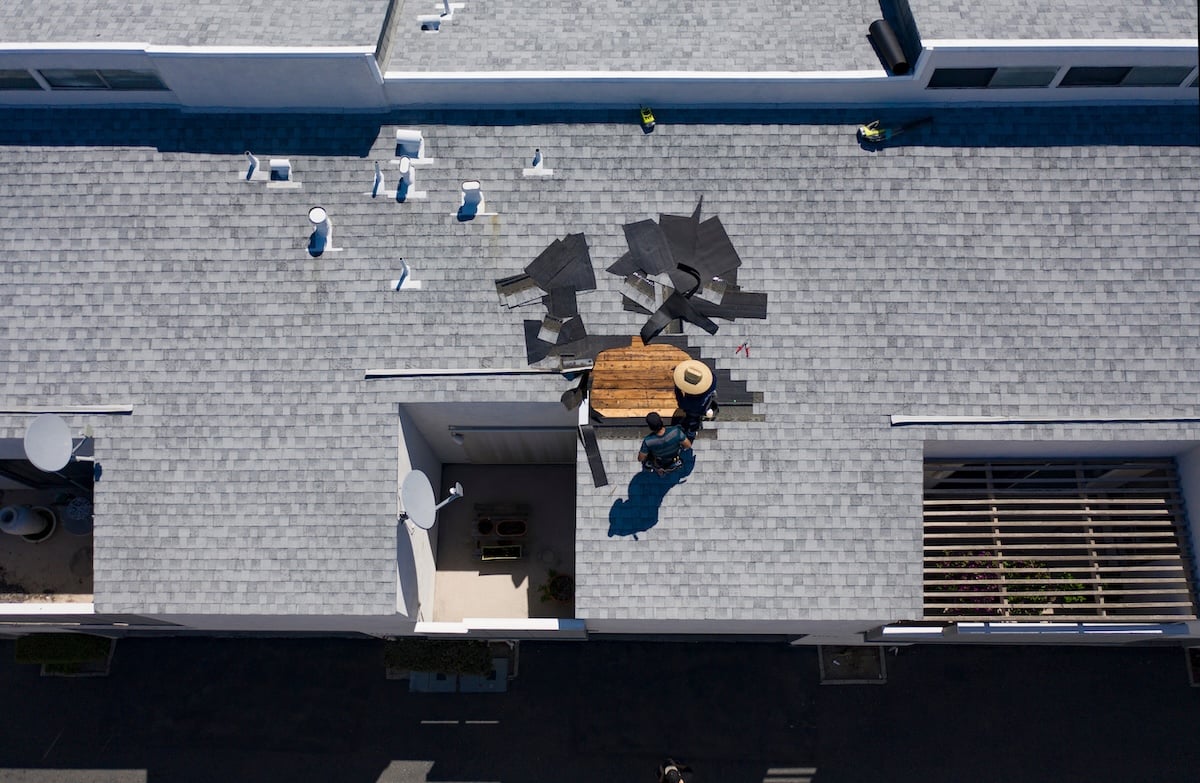
3. Perform a Detailed Roof Inspection
When it’s safe to do so, take the time to inspect your roof for storm-related damage. Use a ladder to get a closer look at the roof surface if you are comfortable doing so, but only if the area is dry and secure. Look for missing, cracked, or curling shingles, and check for granule loss, which may appear as dark spots on asphalt shingles or as granules collected in your gutters. Missing granules can leave your roof vulnerable to future damage.
Examine areas with flashing, such as around chimneys, vents, or the edges of your roof, for signs of damage like dents or lifting. Inspect soft metal components, such as vent covers or chimney caps, for any dents or cracks caused by hail. If you spot anything out of the ordinary, photograph it for documentation. This inspection is crucial, as roof damage can worsen if left untreated. If your home uses asphalt shingles, you might find it helpful to read our post on Best Roof Shingles for Durability and Weather Resistance to better understand which materials can withstand future hailstorms.
4. Assess Interior Damage
After inspecting the exterior, move inside your home to evaluate any internal damage caused by the storm. Start in the attic and check for water stains, leaks, or areas where sunlight may be seeping through the roof. Look for wet or damaged insulation, as this can indicate a breach in your roof or walls. Inspect wooden beams or other structural components for signs of moisture or warping.
Next, survey interior ceilings and walls throughout your home, paying special attention to discolored patches, bubbling paint, or sagging areas that could signal water damage. Document all interior damage by taking clear photos and detailed notes. This will strengthen your insurance claim and help ensure all necessary repairs are addressed. If you notice leaks or water spots forming, visit our guide on Roof Leak Repair for step-by-step solutions to contain the issue before it worsens.
5. Get Professional Evaluation
Even if you don’t notice any obvious damage during your inspection, it’s a good idea to bring in a professional roofing contractor for a comprehensive evaluation. Many types of storm damage, such as slight shingle cracks or hidden leaks, may not be immediately visible to the untrained eye. A professional can identify these subtle issues and provide a more accurate assessment of your roof’s condition.
Hiring a professional is particularly important because untreated damage, even if minor, can lead to bigger problems down the road, including premature roof failure or water intrusion. Ask the contractor to document their findings and provide an estimate for potential repairs. Their expertise can also be helpful when working with your insurance company to ensure all necessary repairs are covered.
6. Work with Your Insurance Company
Once you have documented all damage and collected professional evaluations, provide your insurance company with all the necessary information to process your claim. Share photos, videos, and written descriptions of both exterior and interior damage, along with any reports from a contractor.
Be present when the insurance adjuster visits your property to conduct their assessment. Walk them through the damage and highlight areas of concern. Don’t hesitate to ask questions if something is unclear or if you disagree with their findings. If needed, you can request a second opinion or re-inspection. Your contractor can also help advocate for proper repairs and ensure that nothing is overlooked.
7. Complete the Repair Process
Once your insurance claim is approved, it’s time to move forward with repairs. Choose a reputable roofing contractor with experience in storm damage restoration. Ensure they follow local building codes and manufacturer specifications to maintain the integrity of your home.
Keep detailed records of the entire repair process, including signed contracts, payment receipts, and photos of the completed work. This documentation will be useful for warranty purposes and in case you ever need to make additional insurance claims in the future. With proper repairs completed, you can enjoy peace of mind knowing your home is secure and ready to withstand future storms.
👨🔧 Choosing the Right Roofing Contractor

Selecting a qualified, reputable contractor is crucial for proper hail damage roof repair. The right contractor ensures quality work and helps navigate the insurance process.
Essential Contractor Qualifications
When hiring a contractor, prioritize those with proper licensing and insurance to protect yourself from liability. Request local references to verify their track record and check their credentials with your state’s licensing board. Additionally, review their Better Business Bureau rating to ensure they have a strong reputation.
Choose contractors with specific experience in hail damage repair and handling insurance claims. They should also be familiar with local building codes and the manufacturer’s specifications for your roofing materials to ensure the job is done correctly and meets all requirements.
Red Flags to Avoid
Be cautious of door-to-door contractors who show up right after a storm. While some may be legitimate, many scammers use this tactic to exploit homeowners during stressful times.
Avoid contractors who demand full payment upfront or offer to waive your insurance deductible—both are significant red flags. Similarly, don’t trust anyone who pressures you into signing a contract on the spot. Always request detailed written estimates and contracts before allowing any work to begin, ensuring everything is clearly outlined.
🏠 Trust Great State Roofing for Your Storm Damage Needs
When it comes to hail damage roof repair, Great State Roofing is the team you can count on to protect your home and family. With our industry certifications, experienced team, and commitment to quality workmanship, we ensure your roof is restored to the highest standards. Whether you need expert repair after a severe storm in Fort Mill, SC or comprehensive inspection services in Rock Hill, SC, our certified team ensures quality workmanship and honest assessments.
Don’t wait to address storm damage—contact Great State Roofing today for a free inspection and let us help you get your roof back to its best!

Very professional. Quality work. I would highly recommend for any roofing needs.